Friday, October 14, 2011

Bird Just Under the Wire - SSSC 138

The Sweet Sunday Sketch has become my go to blog for sketch inspiration for the cards I've been making. Karen has some awesome, but pretty simple sketches and its fun to see all the different cards and designs people come up with using the same template.

So this week I turned once again to the SSS.


When I first saw the sketch I thought "no way am I going to do this one this week. I have no time and its way too complicated". Well I was right about the no time. I just finished my card about 10 minutes ago, and in order to enter the contest I have to have my entry in my 10 pm MST. So I'm just under the wire this week.

The card I made is a birthday card for my Mother In Law. Now she's not my favourite person in the world, so sometimes its a bit hard to actually want to sit down and make something. But this past week she did myself and my husband a gigantic favour by coming and looking after our kids while we went away for the weekend for our 8th Anniversary. So this year it wasn't so hard.

The most difficult thing was coming up with a colour scheme. My MIL is not the most girly person in the world, and she doesn't really have a big bold personality (just one that clashes with mine on occasions ;)). So I decided to go with a subtle colour scheme of green and blue.

Well I thought my papers looked great together, but holy crow did that colour scheme end up screwing up my choices for stamps. Most of my stamps are either very flowery, or very girly. So none of them really went. I finally turned to the cute little Taylored Expressions Stamp, Some Birdy Loves You, that I received as a free gift when I ordered a lot a few months ago. It ended up being the perfect stamp for the card. I used a Papertrey sentiment, and I think the card turned out great.


Actually I think this is one of the best cards I've made in a really long time (save for the screw up in the sewing on the one corner: clearly need to buff up on my sewing on paper and around corners techniques)




Tuesday, October 4, 2011

Hangin Out on Your Birthday

My Dad's birthday was this past weekend. I have such a tough time making masculine cards, and I certainly have very few stamps that lend themselves to a masculined themed card. The one thing my Dad does love though is going to Hawaii (are you sick of hearing about hawaii yet? ;)) and he loves chilling out in his hammock, whether its at home or on the beach in Hawaii.

For inspiration this week I used the lates Sweet Sunday Sketch


And this is what I came up with. Not the best card I've made, not the worst. My Dad thought it was great though so that's all that matters.


Tuesday, September 13, 2011

New Digs

I have a problem. My problem is collecting stamps. There are so many great stamp companies out there, and I love all the cute little stamps they make. I buy way too many stamps. I am in need of getting rid of some of my stamps to make home for my new stamps. One of my newest sets, that I was super excited to get, and to use is from Taylored Expressions, Cozy Cottages

I have seem to have a tonne of friends moving this month, so this was the perfect stamp set. The first card I made with this set I decided to use the Sweet Sunday Sketch for my inspiration


I'm usually not a big user of flashy, lots of print paper. But because when I saw the sketch, and I knew that I would use pretty simple plain paper as the foreground paper, I went with a little flash in the back. I had decided that I wanted to make a little scene using one of the houses from the stamp set, with a nice little lawn. I had no idea how I was going to do that since I own no dies, and don't have a "grass" stamp, but then on a whim I decided to check out my cricut cartridges (they get lonely I don't use them often), and I found grass. Awesome.

So here's what I came up with.


Now that its done, there are a few things i would change about it, but all in all I'm fairly happy with the way it turned out (although I'm not happy with my picture, my camera is crapping out on me, and not focusing, the flash is working only sometimes blah blah blah - need a new camera)

Tuesday, September 6, 2011

Happy Hula Birthday

I haven't posted anything to my blog for a long time. Not sure if I'm really going to start posting regularly again or not. I post most of my cards on splitcoaststampers now, and really I don't have much interesting to say about the cards that I post anyway.


Anyway, my niece, who lives in Hawaii is having a birthday in a couple of weeks, which means I Had to get a card done pronto as it takes forever to get anything shipped over there.


I decided to use the Sweet Sunday Sketch as my inspiration


I had recently bought some small stamps from Lizzie Ann Designs that had a "hawaiian" theme, so I decided to use the Hula Girl to make a little likeness of my niece. I needed some kind of background for the little Hula Dancer so I decided to set her on the beach in front of the waves. The only thing that you can't really see in the photo is the chalking that I did for the sky.


Instead of doing a traditional banner that said Happy Birthday on it, I decided to go with a row of Hibiscus flowers, since anyone who has been to Hawaii knows these things are everywhere.


I'm still practicing a lot with my copics, and I'm not all that great at it yet, but I'll get there in time. Hopefully my niece will like the card.

Thursday, April 28, 2011

The Evolution of a Card

I haven't made any cards for almost a month so I thought I should get off my lazy butt and get to work.

I needed a little inspiration this time around, so I decided that I was going to try out my first Sweet Sunday Sketch Challenge. I ended up going through a bit of a card evolution with this sketch. I had to try three different times to get it right :). Here is this week's sketch


I have hope that someday, in the cold frozen tundra that is Canada, that there will be spring, and in turn some flowers. We haven't had much of a spring yet, and its almost May. We've had snow and rain, and sleet and driving winds, and not much sun. So I decided that I was going to go with flowers for my theme just to bring a little bit of light to a rather dreary month.


So my first attempt at the sketch I decided I would go bright and cheery to drown out the dreary, and use yellow. I wanted to use my copics and I find yellow one of the easiest colours to use and to blend. I also wanted the smaller piece of patterned paper to be a bit monochromatic and not too crazy. So here's what I came up with:


Its alright but I knew I could do better. I didn't like the boringness of the one colour thing going on, and I didn't like the way the stems and the leaves of the flowers turned out at all. So back to the drawing board. The one thing I knew I would keep was the embroidery thread and the button.


Second attempt resulted in me trying out a two tone card. I decided once again to use bright cheery colours, and went with pink and orange. These were the colours that I used in my garden with all my annuals last year and I really love the look. I also decided to go with a bit more of a dramatic flare for the side piece of patterned paper and found the perfect paisley pattern with the colours I was looking for. I also decided to colour in the leaves with my copics.

Again it was alright. The leaves and stems were much better this time around, and the brighter more dramatic paper looked much better. I screwed up the stamping a bit though and there was too much white space at the top of the flowers and I didn't like the way the patterned paper looked a little boring and blank on the one side.


So off to try my hand at the sketch for a third time. This time I decided to stick to the two tone colours, but went with more of a contrast. I decided to use a light pink and a springy green. Again I found another version of the paisley paper, because I really loved the pattern. I fixed the problem with my stamping and leaving too much white space at the top of the flowers, and I decided to add a little bit more to the patterned paper I would do a zig zag stitch around the whole thing just to make it stand out a bit more. And of course I stuck with my original button and embroidery thread.


And you know what I really think the third time was in fact the charm. I'm really happy with the way the last card turned out. Now i just have to come up with a reason to send it to someone :)


Stamps: SU In Full Bloom

Ink: Memento Tuxedo Black, Copics (YR15, RV14, RV29, YG17, RV13, RV02)

Paper: I have no idea because I accidently threw out the stickers, or cut off the label a while ago :)

Monday, April 4, 2011

Gift Bags

I made todays card a while ago, almost two weeks ago in anticipation of my youngest sisters birthday. I kind of got sick of doing the whole cupcake birthday card thing, so I decided to use another stamped image. I had just recently purchased a set from There She Goes and decided that I wanted to use the gift bag that was part of the set. Initially I had stamped and coloured about 7 images and thought I would have a crazy gift bag frenzy on the card, but try as I might I just couldn't figure out a layout that would showcase them all and not have it looked like a jumbled mess. So I went with three. I picked the three brightest colours (thought you wouldn't know it from this picture since the lighting was total crap). I added some tissue paper to each of the bags. I wanted to add a little twine detail on the handles, but I couldn't get the twine to sit right and curve properly so I just left it as the stamped image.

I really like both the simplicity of the card, and the cuteness factor. I'll probably end up making one again in the future


Wednesday, March 23, 2011

A Card fit for a Fairy Pirate

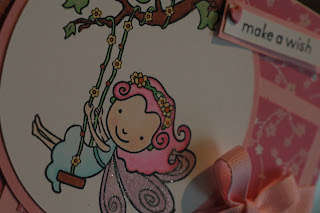
My lovely little baby turned 3 years old yesterday. The time has certainly flown by. When we started talking about her birthday a few months ago she told me she loved fairies and wanted a fairy cake. So I went with the fairy theme. Made the invites, had the cake all planned, then the silly little goose changed her mind and wanted to go with pirates. We went whole hog on the pirate theme when it came to her actual party, but she was out of luck when it came to her birthday card. I had a one track mind and that was for fairies.


I haven't done a mojo challenge for a while, so I thought I would do last week's sketch.


Seemed simple enough. A circle, a square and some ribbon. Not so simple. The fairy stamp I had in mind was huge in comparison to the dimensions of the actual card, so my sizing had to be a little off from the sketch, which was fine by me. I also had to change the orientation from the card to landscape in order to accomodate my Pink Cat Studios Enchanted Lily stamp


My daughter is not exactly the girliest of kids (you would never guess from the pirate request Ha). So I decided to go against her nature and make her a pink girly card (she'll probably hate me for this when she's a teenager). I thought since Lily was swinging from a tree and covered in flowery vines I would try to find a paper that had the same sort of theme. I managed to do just that, and it was pink to boot.

I also decided that since fairies aren't real (sorry to burst anyone's bubble out there) that I would make her a little whimsical and give her pink hair. I love the way her hair turned out. I'm also pretty impressed with myself and my colouring and shading of her dress. I added a little heart brad and tag with the make a wish on it just to make it a little more special for a birthday.


I'm pretty pleased overall with the way this turned out, considering I've been on a bit of a CAS kick lately and this card has a little bit more going on than a bunch of white space.

Stamps: PCS Enchanted Lily
Ink: Memento, Copics
Paper: Gina K, Recollections Itsy Bitsy Ditsy Cherry Pie
Other: Ribbon, Heart Brad.


Friday, March 18, 2011

Cupcakes Galore

I'm almost there in the birthday card making marathon. This is number 3 of 5 that I have to get done by the end of next week. This one is going to my friend who is turning 35 but whose husband dropped the ball and now she isn't getting the birthday that she expected.


I wanted to do something fun with this card. I wanted to use a colour that I don't use very often and I wanted to try something that I don't think that I have tried before. I also knew I was kind of limited once again by my birthday stamps, and that I was going to have to likely go with cupcakes again. So I decided to use a cute polka dotted paper that I recently purchased. I figured it kind of looked sort of kitsch, which is kind of what cupcakes are. So I went with it, and just found a matching red to add a bit more umph


Recently I had noticed a few cards online that had used layers of scalloped punched paper. I thought that it would be perfect for this card since the edges of the punch went with the polka dots, mimicking the shape. I originally thought about doing the entire card background in the punched papers but then decided to just go halfway. I also wanted something to break up the solid red and the polka dots (and to hide an edge) and I found this cute little gingham ribbon so I went with it.

I had a really hard time trying to decide what colours to make the cupcakes. In the end I went with orange, pink and blue. I thought about doing yellow and maybe a red icing, and doing brown cupcakes papers, but decided against it. Because the card was already kind of busy I didn't have much space to put the sentiment, so I made a little tag with a birthday wish.


Stamps: TSG Make a Wish
Paper: Recollections Small Red Dots, Canson Red, Gina K Pure Luxury White Cardstock
Ink: Memento, Copics
Other: Ribbon, Jewelled Brad

Thursday, March 17, 2011

Have your cake and eat it too !

2 birthday cards down, 2 to go (well in the next week anyway). I have yet to decide who is getting this one, its either a friend or my sister. Not sure which. Really depends maybe on how the other cards I make turn out.

So I had a few goals with this one. I usually make cupcake birthday cards, only because those are really the only stamps that I have that sort of relate to birthdays, unless I'm making something for a little kid. I finally purchased a new birthday set, and although it is heavily laced with cupcakes, I decided to use one of the cakes.

I also knew that I wanted to use embroidery thread and a button somehow as accents. And finally I wanted it to be sort of spring like since the first day of spring is this weekend, and everyone's birthdays coming up are all within a few days of this day, so I went with green.


I stuck with my simple is best thing that I've been going with the last little while. Decided to just do one simple cake image, and a simple greeting at the top of the card. I didn't want to use all kinds of elaborate papers. I had the cross hatched paper in a stash of scraps that I've been holding onto. I think its a Martha Stewart paper, but I can't be sure. I thought it lent itself to the understated look I was going for and well I had thread and a button that would match perfectly.

I decided to make the cake a little whimisical with the colour choices just to add a little pop to the card. I had initially coloured in where the pearls are located on the card, but it just didn't seem right, so I decided to go ahead and add another little 3D element to it.


Stamps: There She Goes Make a Wish
Ink: Memento, Copics


Wednesday, March 16, 2011

Happy Happy Birthday Children Dear.........

The birthday extragavanza continues. I have four birthdays to make cards for this week. Thought I would start off with what I thought would be the simplest card to make. My daughter has a little friend, who was born just three days before she was, and his birthday party is coming up this weekend. He's turning 3.

3 year olds don't need anything elaborate, so once again I've gone simple. I decided I didn't want to do any fancy schmancy designer paper, just wanted to use stamps and my copics. I also haven't used my SU stamp set All In The Family in about three years, so I decided to pull it out. This is the cute little design I came up with.


I thought it was perfect to just make a row of kids celebrating a kids birthday, so that is what I went with and of course this stamp set was perfect for it. The most difficult thing was lining up the stamps so that heads were on bodies and hats were on heads. You can see I had a little bit of an issue with some of them, but that's what you get with woodmounted stamps. You can't see where you are placing them.

I tried to make it as colourful as possible without going nuts. I think it worked out. I also decided the kids weren't enough so I added a little pop of colour with the ribbon. The one thing I think I maybe could have added was perhaps one of the kids holding a balloon. But I'm not going to go back and add that now.


The one thing I hope everytime I make a card for a kid is that the parents are like me and they save everything for their kids. I hope that sometime down the line this little boy will look back at his birthday cards a truly appreciate the time and effort (but he's a boy so he probably won't :P)
Stamps: SU All In The Family
Ink: Memento Tuxedo Black, Copics
Paper: Gina K Luxury White Cardstock

Thursday, March 10, 2011

A Heartfelt Thank You & Aloha

My kids attend a local preschool. The teachers at the school are absolutely fantastic. Unfortunately late last year just before Christmas, one of the teachers (who happens to teach both my kids) had an accident at the school and broke her leg. She required surgery on the broken leg and has since been recovering and going to physio to get herself back to what she used to be. We've all missed her.

In the meantime the school found a wonderful replacement for her. Miss Katie. We love Miss Katie. My kids love Miss Katie. She's a fantastic teacher and just seems to really bond with the kids. Well Miss Katie is leaving the school, as Miss Cathy has finished her rehab and will be returning to teach after March Break. We are all going to miss Miss Katie. So I thought it was only the right thing to do to make her a thank you card to say what a wonderful job she has done and how much my kids thank her for caring about them for the last several months and to say Aloha.


I have really come to appreciate simple cards. Not too much going on. I thought about doing a sketch this week, went and looked at Mojo and almost had a heart attack looking at how busy it was. So I opted to go my own route.

We love everything Hawaiian in our family so I decided to go with a hibiscus stamp that I recently purchased from Verve. And of course this gave me the opportunity to once again practice with and use my new copic markers. I also tried something else for the very first time on a card: I took my lazy butt up to my sewing room and sewed a small little frame around the card.

The one thing that I'm not happy about is the thank you stamp that I used. I have a gazillion stamps. You would think that in a gazillion stamps I would have a decent thank you stamp. Just a simple thank you. But this was the best I could come up with. Its a little small. Something bigger, but just as simple I think would have looked better. So note to self, buy a better thank you stamp


All in all I'm pretty happy with the way it turned out. I like the colours I used, I think its vibrant, but has maintained the simplicity I was going for. Hopefully Miss Katie will like it.

Stamps: Verve Hibiscus; SU Short and Sweet

Other: Copic Markers, Momento Black Tuxedo Ink

Wednesday, March 9, 2011

A Fairy Happy 3rd Birthday

At the end of the month my youngest daughter turns 3. So of course we are having a birthday party for the little monkey. We went back and forth on themes. She wanted fairies, then she wanted princesses, then tigers, then superheroes. I was all set to do the superhero thing, but couldn't find a superhero stamp. So I managed to convince her to go the fairy route.

As you may have read I'm the proud new owner of a bunch of new copics, so of course I decided why not this invite for the first try of the markers. I used a great Pink Cat Studio fairy stamp, and went to town colouring.

I also wanted to make sure that for keepsake purposes it was pretty evident which birthday this was for. So after digging through my stamps and trying out all kinds of flower and grass stamps I settled on an SU stamp from the Just Like You set. I added a little fairy dust and magically a little flowery 3 appeared :).

I'm not very good at shading (yet) but I will get better with practice. I also made a few mistakes and because when I started I didn't have a blender (they were on backorder) there wasn't much I could do to fix them. But I think it turned out okay for a first attempt


Oh and excuse the disgusting lighting on this picture. I have no idea what the heck was going on. I think my nice SLR is about to cack out.

Wednesday, February 23, 2011

Going where this stamper has never gone before

I'm entering the world of copic user. I couldn't stand it anymore. I know I'm not the best colourer (is that even a word?) in the world, but it was made worse by the crap markers I had. I'm pretty good with my watercolour pencils and my chalks, but if I wanted more bold colours I needed to use markers. So I decided to take the plunge.

I bought 36 markers yesterday, with plans to buy at least another 15 more. Now I just have to wait for my new cardstock and memento ink to show up and its off to the copic races

I know that the copics aren't going to solve all my colouring issues, as some of them are my lack of ability, but with some practice they should help a little bit. Or at least that's what I told my husband when he had sticker shock when he saw the price of the markers. Ha! I told him cardmaking is a dangerous habit.

Wednesday, February 16, 2011

Hau`oli la hanau !

Five years ago my sister and her family set out on a crazy adventure and they moved halfway around the world to Hawaii. Its been great. We get a trip out of it every year to the North Shore of Oahu in the middle of winter. We just got back from three weeks at the beginning of February and it was awesome. I love it there, and am mildly jealous that my sister lives there and can go to the beach anytime she feels like it, gets to wear shorts and flip flops year round......sigh if only.

My Brother In Laws birthday is coming up next week, and I decided because they live in the sun and surf that I was going with that theme for his gift and present. We bought a shirt and a hat from a store called Life is Good. The shirt has an old Woodie with a surfboard on it. Once I had the shirt in my hand I remembered that I actually owned a stamp set that had the same thing in it. I haven't used my SU Just Beachy set in ages, but of course it was great luck that I had it.

So I decided to go with some beachy colours and do a little beach scene using the woodie with the surfboard on the roof rack. I did all the colouring with my SU water colour pencils (they are quickly becoming my favourite tool to use for colouring)

I think its pretty cool Dude!


Stamps: SU Just Beachy
Ink: Colourbox Dragonfly Black & SU Watercolour pencils
Paper: Random scraps of cardstock

Monday, February 14, 2011

Little Pinky Bunny

My little sister is having a baby in a few weeks. She had her baby shower on the weekend. So of course a card was in order.

When we first found out she was having a baby and found it was going to be a girl, for fun we asked my 2 kids what they thought the baby's name should be. Of course they came up with something awesome. The first thing that both of them said was Pinky. I asked my oldest what she thought the middle name would be, and after some pondering she announced that my sister and BIL would of course give the baby the middle name Bunny.

Since that day my kids have been looking forward to the arrival of Pinky Bunny. They talk about her all the time. I'm almost positive that no matter what my sister decides to name her baby that my kids will call her Pinky Bunny anyway.

So I made a card just for Pinky Bunny. I used a Pink Cat Studios digi stamp. I only had one other set of "baby" stamps and I've used it for years. I didn't want to buy a whole new set of stamps, so the digi was the best option, and of course Pink Cat Studios has some pretty cute ones.

I had a perfect design in my head, but it didn't really turn out how I wanted it. I had a hard time choosing a background paper that I liked, and I just didn't end up liking the colour combinations that I used for the solids and the buttons. But cest la vie. I went with it. My sister liked it


Sunday, February 13, 2011

2 Littlest Valentines

I have two kids, two little girls under the age of 5. What do little girls love more than anything? Pink and cute little animals. The two of them are obsessed with "stuffies", and pretty much my life revolves around all things pink. So hey Valentine's Day is the perfect opportunity to exploit both of those.

I really really loathe colouring in stamped images. I'm horrible at it, but sometimes that's just what you have to do. I've tried markers (all been them a bit on the crappier side) and I've done the whole chalk thing. I find I'm best using my watercolour pencils from Stampin Up. I'm still not awesome at it, and they don't really have the most in terms of colour collections but that's what I ended up using for both of these cards to colour in the stamped images.

I also branched out this time and used a digi stamp for the first time. The heart teddy bear came from Pink Cat Studios. It took me a long time to decide to use a digi stamp just because of its unconventional-ness, but I went with it, and i think it worked out well in this case.

Anyway, without further adieu this is what I came up with for my kids. A swingin' Monkey and a balloon toting bear :)


Monkey Card:
Stamps: Verve Love Monkey, Verve Heart to Heart, Verve Forever in our Hearts
Paper: GCD Studios Light Stripe, Rose Coloured Glasses
Ink: SU Pink Passion, Chocolate Chip, Certainly Celery
Other: SU Watercolour Pencils, Embroidery Thread, Offrey Ribbon
Bear Card:
Stamps: Verve Heart to Heart, Pink Cat Studios Heart Teddy Bear
Ink: Rose Red
Paper: GCD Studios Rose Circles
Other: Embroidery Thread

Wednesday, February 9, 2011

Baby Baby Baby ooooh....

I'm embarrassed to say I have Justin Bieber on the brain :)


A friend of mine is having her second child in a couple of weeks. I only see her about once a month as we have a regular dinner set up, and by the time next months dinner rolls around she will have hopefully given birth. So tonight is the last dinner before the baby arrives.


I got busy making stuff for her. We were away in Hawaii for a couple of weeks in January and while I was there I managed to pick up some awesome Hawaiian fabric. I decided to use it to make a blanket, a bib and a burp cloth for her (I make this pretty much for everyone I know having a kid). Unfortunately I didn't take pictures before I wrapped it, but trust me they look awesome with the fabric.


She doesn't know whether or not she is having a boy or a girl, so the card I made to go with the present had to be fairly neutral. I decided to go with yellow as my base colour. I really liked the cards I made for my sisters baby shower a while ago so I also decided to go ahead and do the same for my friend. So she got herself a onesie card again. I can't help myself though I had to girly it up a bit with the bow.


Tuesday, February 8, 2011

Be Mine - Mojo 177

I haven't participated in a Mojo Monday sketch challenge for a long team, even though I look at them every single week. As soon as I saw this week's sketch though I knew that I was going to go ahead and make a card using it, and put my own little spin on it.


Right after Christmas I loaded up on Verve stamps, most of them were Valentine related, so what better a time to use them. Valentine's is just a bit less then a week away and I need to make at least 3 of them for the kids and the husband. I always have a hard time coming up with something for my husband. I want it to be not to feminine, not too masculine, not to cheesy. All tough things when it comes to Valentine's, hearts and pretty much all things pink.

As soon as I saw the sketch for this week I knew I was going to attempt to make a mini envelope on my card. It fits in perfect with the sketch, and what better to fill a valentine envelope with than a couple of hearts and little message.

So here's what I came up with:


I'm really pleased with this card. You can't really see it in the photo but the two hearts look like they are almost popping out of the envelope. I'm also really happy with the way the colour combinations came together, and I think the dotted paper that I used lent itself perfectly to the occasion.
Stamps: Verve: Flirty Phrases, Heart to Heart
Ink: SU Pretty In Pink, Rose Red
Paper: Paper Co Ruby Jewel, GCD Rose Coloured Glasses Stripes
Other: Recollections Pearl Stickers.

Monday, February 7, 2011

Holy Buttons Batman!

Day one of Cardapalooza. My daughter attended what seems like her 1,356,749th birthday party for one of the kids in her school. It took place at an indoor playground, which seems like the statutory place to hold a five year olds birthday party. Not particularly inspiring.

I don't really know the little boy the party was for, so didn't really have much to go on to personalize the card. Heck even my daughter didn't really know what he would like and she spends every afternoon with the kid. So I decided to go pretty neutral

Last week on the Mojo Monday sketch they had a sort of swooping design so I decided to go with that as my inspiration. I also hit Michael's this week to find some new paper (ha not that I needed any I must already have over 1000 pieces of the stuff), and I found one that looked like it belonged on a birthday card. Lots of colourful dots. I figured what better than buttons to go with the dots. So I did my best to match the colour of the dots with the buttons that I had on hand and this was the outcome.


I think its cute, turned out pretty good. My stamping was pretty crap, because for some reason the ink that I used wouldn't adhere to my new Verve stamp, and the paper got a little crumpled on the edge thanks to the rambunctiousness of my 2 year old.

In other news, it appears that the top of my grand piano seems to be the perfect place to take a picture of a card, especially when the sun is out.

Stamps & Ink: Verve Stamps Happy Birthday, SU Brilliant Blue
Paper: Recollections CardStock, Brightlights Big City
Other: Misc Buttons

Friday, February 4, 2011

Card-a-palooza

The next two months are going to be a Card-a-palooza for me. I have birthdays coming out the ying yang. New babies waiting to be born all over the place, and of course, the big pink and red day coming up in a week and a half, Valentine's day!

I be a little bit more active on my blog in the next couple of weeks. Hopefully I will actually get some time to sit down and make some cards :)